

As my earlier posts have noted, I have been exploring various options to digitize my film negatives and slides. I have an Epson V700 flatbed scanner, a Plustek Opticfilm 120 scanner, and have also tried scanning using a Fuji XT-1 APS-C (16 MP) digital mirrorless camera with both a Leitz BEOON copy stand, and more recently, using a Minolta Copy Stand II. The scan quality in general has been inversely proportional to the scanning speed of the specific method; to obtain better scan quality generally requires a method that employs a longer scan time per image. If I want my best scan, I use the Opticfilm 120, but that takes several minutes to scan per frame. The V700 is next in speed, and has generally good scan quality for large format and 120 film, but is marginal in image quality, in my opinion, for 35mm. The quickest option is to use the digital camera with a macro lens setup in a copy stand on an LED light panel; this actually yields quite good image quality and is very fast – the biggest delay is the time it takes to load the film into a holder.
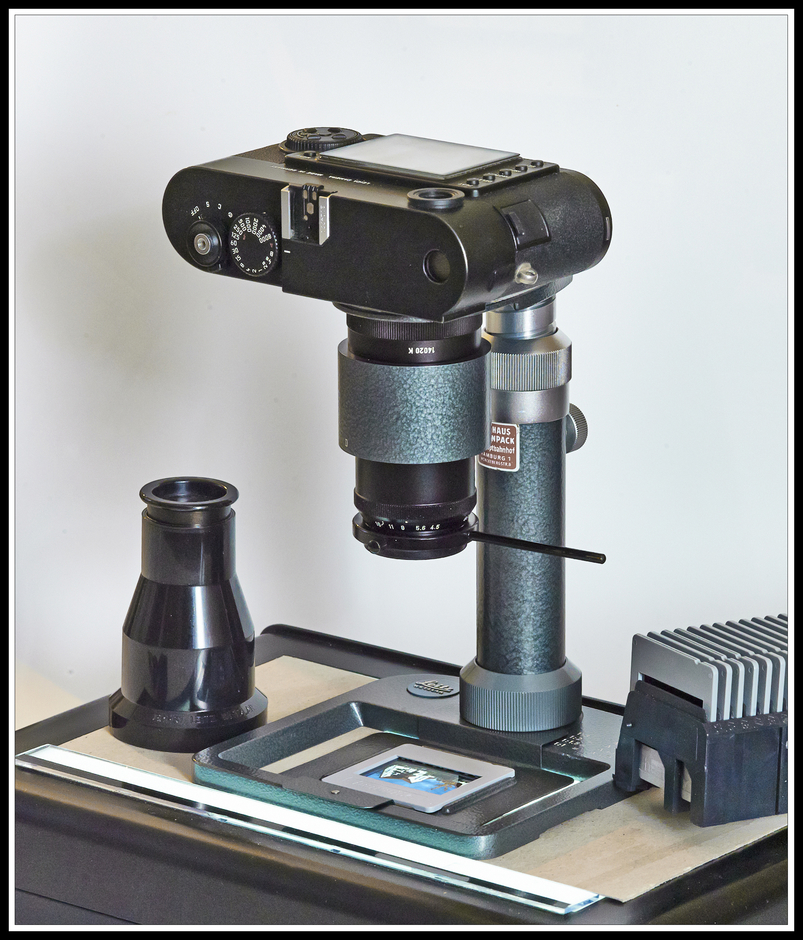
I have been recently trying the digital camera scanning method due to the relative speed of digitizing, not an insignificant issue if you have several rolls of 35mm, at 36 frames per roll, to digitize. I was initially excited about the Leitz BEONN, which is actually quite good for 35mm scans, using a EL Nikkor enlarging lens with the BEOON’s macro tubes. However, I found it difficult to come up with the correct enlarging lens and macro tube combination for medium format scans, especially for 6×7 and 6×9. Additionally, the BEONN just starts to run out of enough vertical adjustment for the large film formats. This led me to switch to the Minolta Copy Stand II, a discontinued traditional copy stand that I acquired on eBay.

This copy stand allows me to digitize film from 35mm up through medium format, and probably 4×5 as well, although I haven’t tried that yet. I am using a Fuji XF 50mm F2.4 Macro lens on my Fuji XT-1, and using manual focus along with focus assist allows me to get the camera easily set at the correct height for repeatable shots of multiple film frames in sequence. This setup also employs a Kaiser Slimlite Plano LED panel for film illumination (previously used a Artograph Lightpad 920LX, but replaced it due to the Kaiser’s better color rendering index, or CRI.)
The next element of this digitizing protocol is the film holder. The BEOON basically employed a metal masking frame that held the film flat against the light panel; this could theoretically lead to Newton’s Rings, but I never encountered this phenomenon. Even though the masking frames are finely crafted like all Leica gear, I was always concerned about the potential for scratching my film with these. This concern, along with the fiddly setup of lenses and macro tubes for each change in film format, plus the inability to easily accommodate 6×7 and 6×9 film, led to the adoption of the more easily adjusted Minolta copy stand. This stand, however, does not incorporate any film holders, so I have experimented with film holders from my Epson V700 and my Opticfilm 120. The Opticfilm holders are rigid and robust, and proved to be more convenient for use with the LED panel and Minolta copy stand.

After watching Matt Day’s video, “Scanning Film with the Fujifilm XT-3,” on YouTube, I was intrigued by and purchased the 35mm and 120 format Digitaliza film scanning masks sold by Lomography. These are also rigid and well built, and employ a magnetic clamping feature to quickly align film in the holder and keep it flat.

The last element of this digitizing process is software. When I am using the dedicated scanners I use dedicated scanner software; EpsonScan which comes with the EpsonV700, or VueScan, which is compatible with virtually any dedicated film scanner. In the case of the Plustek Opticfilm 120, I do not use Silverfast, the manufacturer provided software, due to the many complaints about its user-unfriendly interface, although I do hear reports of it yielding good results if you work through it. In my case, I again use Vuescan. This is not a post where I will go through my scanner settings, but suffice it to say, I try to keep it simple.
For black and white film scans, there are many manual and automated methods to readily invert and process the digitized image. Color scans, particularly color negative film, are more complicated due to the orange cast of the film. This can be difficult to correct repeatably using manual post-processing methods, so I use one of two programs to assist me in getting good color conversions: CF Systems ColorPerfect, which is a filter installed in Photoshop, or Negative Lab Pro, which is plug-in for Lightroom (and only Lightroom, not available for other programs like Capture One). Again, I will not go into the details of working with these programs, but can attest that they are powerful and give good results, particularly with color negative film – see their respective websites for complete descriptions and tutorials.
When using a camera to digitize color film, you again have the orange color cast problem to deal with in post-processing. Both ColorPerfect and Negative Lab Pro can also be used here, but I really recommend Negative Lab Pro in this workflow, as this is what is was really designed to do; it is both very powerful and easy to use (ColorPerfect is probably more powerful but has a much more intimidating interface and is no where near as intuitive as Negative Lab Pro.)
So here I have described my various digitizing workflow options – what are the results? Generally, they have been very good. I originally planned to use the images digitized with the camera as basic “contact sheet” files to select files for higher resolution scanning in the OpticFilm 120. However, even the low-resolution-by-current-standard 16 MP images from my old Fuji XT-1, combined with the great Negative Lab Pro conversions, has given me some images that are very satisfactory for online posting and even printing up to 13×19 inches. The one change to my digital workflow I have had to add is to return to Lightroom for camera digitized film files, as Negative Lab Pro only works in Lightroom; I import my digitized files into Lightroom, process them there with Negative Lab Pro, and then I import them into Capture One for all further cataloging and processing.
But not all has been good. Earlier this month, I developed a number of color rolls, both 35mm and 120 film, that displayed very disturbing color anomalies on both the digitized negatives and the processed images. These images exhibited rusty/orange streaks, most commonly running radially in from the image corners. I attributed this to some kind of film processing error (I develop my C-41 color film using a Jobo film processor); I was sure I was either somehow contaminating my chemicals, or insufficiently bleaching and fixing of the film. After mixing up three separate fresh batches of chemicals, both from Tetenal and from Fuji Hunt, I was still seeing these image-ruining color anomalies.


My online searches regarding color chemical processing problems yielded no answers, so I turned to some film oriented groups on Facebook in which I participate. From The Darkroom, group member Caleb Marshall provided this comment, “This is on the negative right? Might be a stupid question but looks alot like scans do when the film is very curly and edges are not flat.” Bells went off in my head – I realized my problem was not with the chemistry or developing process, but with my scanning technique. I immediately grabbed some black gaffers tape to mask off most of the LED light panel except for the area immediately under the subject negative, and rescanned the errant negatives. Huzzah!


While Caleb’s comments were valid regarding insufficiently flat film during digitizing, I do not believe this was a factor in my case; my film holders hold the film pretty flat. But he did wake me up to viewing the problem from a different perspective. The evident problem was light leaking into the scan from the edges of the frame, due to the excess light around the film not being masked out. I will now be coming up with a more permanent masking device for my LED light panel to eliminate excessive light bleed and flare during digitizing to preclude this problem in the future. If there is interest, I will put together a more detailed description of my total digitizing workflow in a future post. For now, it is back to shooting film with the confidence that I can obtain good workable digital files.

Hi Mike–Thanks for this helpful blog post. How has the Minolta copy stand worked out for you? I have had difficulty finding an affordable copy stand to use for Digicam based scanning that holds the camera with sufficient rigidity so that it maintains focus and vibrations aren’t a problem. Even the Negative Supply expensive fancy ones have had issues. This Minolta one looks very well made. I am interested in your opinion as I have found one for sale. Thanks!
The Minolta copy stand is okay – well made and rigid. The only negative is that there is no fine adjustment on the vertical travel of the camera mounting arm on the column – you just loosen a locking knob, move the arm up or down as required for the film format and lens being used, and then tighten the knob again. No real repeatability or precision – a geared and marked column would be much better, but does not seem to be readily available at a reasonable price.
Hi Mike,
I have just acquired a Minolta copying stand II and I’m looking to sell it on. Do you know roughly what I should be asking for it?
Best Wishes,
Stephen 👍
Stephen:
I bought my Minolta copy stand on eBay in March 2019 and paid $200 before shipping. If yours is in good shape you should be able to get something comparable, as it seems they are not very plentiful in the marketplace. Good luck!